Mar 30, 2026
The 2026 Global Fertilizer Shortage and Maximizing Returns
Read More

February 14, 2023
When was the last time you tested your soil to get a reading of its health and quality? Not just on your own, but with the help of lab experts and a trusted crop adviser? While you could do at-home tests or the earthworm test, these only show a grower part of the picture.
It’s important to get a full picture of your soil’s health and quality. Growers need to know their soil’s pH levels, soil structure, chemical composition, and biological makeup down to a microscopic level. Only a lab test can provide you with the granular information to make meaningful changes to your fields this year.
Then, you can put the results from your soil test to work. The information gathered can influence the regenerative agriculture practices you implement to improve your soil’s health and quality.
Practices like minimizing soil compaction and supporting soil microbes with a nutrient-rich meal like PhycoTerra can maximize your spring planting for higher yield potential.
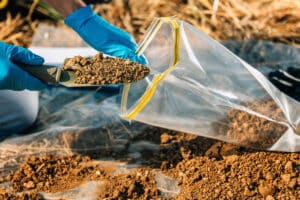
A soil test is the process of gathering soil samples from around your farm and sending them to a lab for testing. While many growers send samples off themselves, some may also hire a company to collect the samples. Growers use the results to make informed decisions to support their crops.
These tests provide key insight into the biological, physical, and chemical composition of your soil. Tests cover the basic texture and structure of your soil, pH, and salinity levels, as well as phosphorus, potassium, calcium, magnesium, sulfur, and other micronutrient levels.
Soil tests don’t usually include nitrogen due to the many variables which regularly fluctuate and impact nitrogen levels.
Yes, soil tests are worth the investment if you want to make informed decisions based on your soil’s health for a successful spring planting – especially if it has been three to five years since your last test.
Soil tests arm growers with the information they need most to improve their soil’s health and quality. The main benefits include:
Soil tests can identify excess levels of nutrients, salts, high pH levels, low organic matter, or drainage issues.
If a problem is being diagnosed, growers should take soil samples from the areas with both normal and abnormal plants to make a comparison.
Note: The process of taking action on soil tests can take two to three weeks of planning. Gathering a soil sample, sending it off, receiving, and interpreting the results, and purchasing products take time.
Plan accordingly to get your results and products in before planting.
Hoping to generate a good yield with unhealthy soil is like playing a game of poker with all the cards stacked against you. By understanding the levels of different nutrients in the soil, growers can make informed decisions based on their crop’s needs to improve yield potential. Soil tests balance the odds for a winning hand.
For example, soil pH levels can determine your crop’s growth and vigor. Highly acidic or alkaline soils can be a sign your spring crops are in trouble. The pH scale is between 0 and 14, with 7 being neutral. Soils with readings below 7 are acidic and above 7 are alkaline. Readings on the far ends of these two levels can cause soil nutrient tie-up, stunt crop growth, prevent yields, or even cause plant death.
Keep in mind some nutrients and species fluctuate seasonally. Spring is the best time to gauge your soil’s nutrient availability before planting.
While many growers may only test every three to five years with perennials, annuals can require more regular testing. Experts suggest conducting a soil test once every two years for annuals, and more frequently if the field has had regular organic or synthetic fertilizer or amendment applications.
Regular testing can help monitor changing soil conditions and avoid build-up.
First, select a soil lab in your region to perform the test, and continue to use the same lab from year to year. Often, labs have different extraction procedures and units for sharing results, so interpreting results from different labs can cause confusion.
Certain states have regulations for the types of soil testing growers can do. You can find out if your state has regulations for soil tests in your state’s department of agriculture.
Be sure to keep records of areas sampled, soil tests, fertilizer application, crop rotation, and post-harvest residue management. When it’s time for harvest, note the yield and quality of the crops produced.
These metrics can help inform future soil decisions.
Getting an accurate sample is the difference between following the recipe, or not, when baking a cake. If you don’t follow a specific recipe, there’s a good chance you’ll end up with a flat or burnt cake. Following the recipe creates fluffy, moist cakes. Following soil sample best practices can lead to a successful spring planting.
First, you need to determine your field management units. You can use boundaries, soil types, crop rotations, or a combination of all three. It’s up to you if your unit includes 50 square feet or 10 acres.
In those 50 feet or ten acres, you’ll want to do a zig-zag pattern throughout the area, gathering 12 to 15 samples by the time you’re finished.
Sampling depth is six to eight inches. Mix all samples in a clean bucket and mix until combined. Send one cup of mixed soil to the lab in a carefully labeled bag or container.
Some other best practices:
Sometimes a soil sample test may seem straightforward, and you’ll feel comfortable making a plan for spring planting.
Other times, you may not feel quite so confident. You’re not alone in deciphering your soil test. Growers should reach out to their agronomist, state extension specialist, or crop adviser to talk through soil test results and nutrient recommendations.
Your soil test may have you running to buy products to improve your fields. Instead, work with a trusted adviser to ensure you’re changing practices or applying products to help solve issues you are seeing in your field.
Soil is a diverse and constantly changing ecosystem. Testing your soil in the fall is a good idea because it can give clues as to what your soil is missing or provide guidance for needed amendments. With time between the soil test and planting, growers can make changes to improve soils during the winter months.
Cover cropping, adding amendments, feeding hungry soil microbes, or mitigating compaction are all steps you can take during the winter.
If you take the information your soil gives you in the fall, and apply it over the winter, come spring, you’ll want to look into the results. Especially if in the previous year you didn’t achieve the results you were expecting.
A spring soil test is a great idea for any grower to gauge where your soil is before planting. Seasonal tests are also recommended for growers who have made changes to their fertilizer program.
Soil amendments or soil microbial food solutions can improve germination, stand, and yield by supporting the roots of your crops. The trick is knowing which amendment could make the biggest impact. Adding amendments changes your soil’s properties to support crop health.
By working with a trusted crop adviser, you can make a plan to use amendments to improve your soil structure, texture, biology, and chemical composition.
For soils with poor structure, amendments can improve soil aggregation. These aggregates increase porosity, aeration, and drainage, and can allow for deeper root depth.
For sandy soils, amendments can improve water- and nutrient-holding capacity.
Amendments come in organic and conventional options. To pick an amendment, you’ll likely consider your soil texture and structure, its salinity levels, how long the amendment will last in the soil, your crops’ sensitivity to salts, and the pH level of the amendment.
Once you’ve received your soil test results, make a spring planting plan. There are many benefits to considering regenerative agriculture practices to support your soil and crops. By investing in cover crops, no-till or low-till practices, and feeding your soil microbes, you can support your soil’s health, so it can support your seeds and crops come spring.
The economics of soil health suggest improving your soil with your day-to-day food production practices whenever possible to increase yield potential. Here are a couple of things to consider while making your spring planting plan.
Even if your soil test doesn’t indicate you need a winter cover crop, investing in a cover crop is always a good idea. Cover crops help prevent wind and water erosion. A root system in your field will hold onto your soil.
The root systems of winter cover crops can also help reduce soil compaction. Choosing a cover crop like Daikon radishes breaks up soil compaction and increases aggregates.
Your cover crop is also a great way to store carbon in the soil, improve nutrient availability, and support soil life. Your soil microbes will thank you for the extra biomass!
Come spring, it can help your fertilizer application go further. When it’s time to plant, mow down the cover crop. Not only is the post-harvest residue a good mulch, it can also help with weed prevention.
Post-harvest residue can have an impact when it comes to spring planting. From popped tires to clogged machinery, it’s no wonder tillage became a best practice to deal with residue.
Some growers may consider burning or tilling their fields, but these aren’t the best regenerative options for dealing with post-harvest residue. Burning fields can destroy your microbiome. Excessive tillage can cause soil compaction and breaks up soil microbial communities.
Compaction creates root impediment and nutrient loss. It can also create impenetrable layers, separating biological life from nutrients. Root impediment, nutrient loss, and impenetrable layers aren’t good for your bottom line or ROI.
There is a better option to manage post-harvest residue.
First, look into shifting your practices to a no-till or low-till system to avoid compaction. To do this, consider every single pass you’ll need to make with heavy equipment through your field. Where can you cut back on passes to protect your soil? Where can you afford to experiment with a no-till or low-till system?
To manage pesky post-harvest residue, growers can also consider using PhycoTerra with a burndown herbicide to reduce residue. Studies have found a 36% reduction in crop residue and a 6-degree temperature increase in topsoil temperature at planting.
Plus, this regenerative post-harvest residue management practice offers many opportunities to maximize return on investment:
According to the Soil Health Institute, “soil that is undisturbed and has more continuous living roots will begin to show improvements in structure, as organic residue from plants and microbes glue mineral particles together to create aggregates.”
Avoid planting in wet conditions to avoid compaction. It’s always worth it to wait until your fields are dry to protect your soil structure and texture.
Inside your soil is a mix of fungi and bacteria known as soil microbes. Awake and well-fed soil microbes help make the most of your fertilizer, reduce abiotic stress, improve nutrient utilization, and create aggregates to improve soil structure.
Most growers aren’t reaping any of these benefits, because 75% of soil microbes in farm soils are dormant due to starvation.
There are two ways to wake up and activate dormant or starving microbes.
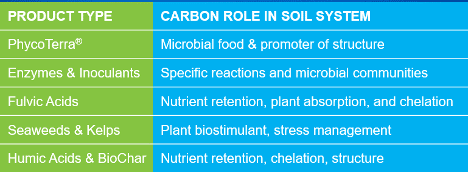
First, add organic matter to the soil. Stack carbon products, like inoculants, humic acid, and organic fertilizers (manure, seaweed, kelp, compost, etc.), to support your soil microbiome. These organic additions will also improve soil structure and can help plants access air, water, and nutrients via porous structures.
Second, consider investing in a soil microbial food like PhycoTerra to feed hungry soil microbes. Supporting your soil microbe community is especially important if your soil test has indicated any sort of compaction. Soil microbes, when fed will in turn help your crops access nutrients and improve soil aggregates.
PhycoTerra delivers a nutrient-dense meal to starving, dormant microbes to wake them up dormant and put them to work supporting your crops and soil.
While it’s important to feed hungry soil microbes, it’s equally important to consider supporting microbes around the spermosphere.
The spermosphere is a 2 to 12 mm wide area immediately surrounding the seed. This space is your seed’s first introduction to the real world. It’s important to make it a positive one with extra support to ensure the seed’s success.
PhycoTerra ST can supercharge your spermosphere. By feeding hungry microbes around the spermosphere, they can support your crop’s germination, stand, and yield production.
Other benefits of a supercharged spermosphere include:
The seed stage of a crop’s life is when it’s most susceptible to harm. There’s so much potential yield wrapped up in one compact space. Yet, abiotic stressors can diminish a seed’s potential in an instant.
A strategic seed treatment, including PhycoTerra ST can give your seed the extra support germination, early vigor, stand establishment, and
In the 2023 spring planting season, there’s a good chance some growers will be fighting droughts, while others will be navigating torrential rainfall. Some will be reactive to soil compaction, and others will be proactive. Growers will be planting everything from corn, to wheat, to blueberries, or almond and nut orchards. Yet, for all growers healthy soil equals healthy profits.
There are regenerative agriculture practices to help support all growers with spring planting. Starting with a soil test, taking steps to avoid soil compaction, and supporting soil microbes can provide ROI and yield potential wins for all growers.
Gather information, make a crop input strategy, and 2023 could be your most successful spring planting yet!
Fill out our contact form if you’re ready to engage your soil microbes for better yield potential.
Note: All trial data is current as of blog posting. For the most up to date trail data, please visit our trials page.
Preserving the Future of Farming
Learn more about our mission to keep farming economically and ecologically sustainable.
Learn More